Our first task in Unity is to create a shipping dock, so that we can familiarize ourselves with all of the capabilities Unity offers. We began by deploying a cube game object. This was used as the surface for our test level. To experiment with some of the lighting we simply placed a cube on the existing surface, and also a third person camera to enable us to assess the scale of the scene. I wanted to achieve a moon lit feet, so a directional light with a blue tint was appropriate. To try and simulate a street lamp, I used a yellow tined spotlight shining down on the cube. To prevent our third person camera from falling out of the scene, we deployed invisible barriers, using cube shapes and un-ticking the mesh render option. This was the point at which we also learned that by creating a empty game object, you can use it as a parent to group objects together. The empty object should be at the central point of the group so that everything remains in place when the group is rotated. We were also taught how to insert a sky box. This tool is under the render settings option in the edit menu. At this stage, some of the helpful tips we were taking were also to start at coordinates 0,0,0, and to always save the scene and the project. We also learned a very important point of making sure that the play button isn't selected when editing. If this is left on, when the play button is un-ticked all of the changes made are instantly lost. Bellow is a scene shot of the first test room we created, with the lighting and the skybox:

The next stage was to block out a shipyard environment. This is the process of using simple polygon shapes to create a 3D draft of a game level. I created to lowered docks, with large rectangular polygon shapes resembling shipping crates, and flatter polygon shapes resembling wooden pallets. As a barrier for the player, at the back of the map of the map Included a large wall of lightly offset stacked crates for realism. At either side of the level I also included two large buildings to indicate where the storage warehouses would be. Finally, we used the preset water asset to add realism to the scene:

We also looked at texture UV mapping cube objects. This is the section I fell behind on. I understood that all of the UV and bump maps are separate assets in the project menu. A new material must then be created from the assets menu to be assign the existing textures. I understood the bump mapping and specular diffuse bump mapping. The concept I struggled with was preventing the wood from emitting a specular, whilst having the stone areas of the crate shiny. Perhaps it is more of a misunderstanding in Photoshop, but it is definitely something I will need to pick up on over the module. I have worked with alpha channels before when converting pencil drawings to line art for digital colouring in Photoshop, but I did not manage to achieve the part shiny part lambert cube. Another tool I fell behind on was the ability to create and share an internet version of the levels we created, so unfortunately at this stage I can only offer a screenshot of the crate texture test at this stage:

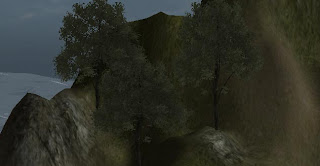
Possibly one of the most exciting features so far in my opinion, was the terrain tool. This is essentially a flat plane, that can be manipulate using different brushes to form mountains and the likes. We used this tool on a different shipyard, which we had created again as practice with Unity. By adding hills to our shipyard scene, the edges of the water plane were hidden, making the scene look more realistic. There is also the ability to apply trees using a brush, which is handy for creating dense forest without having to tediously place trees one at a time. We also imported a new package which we downloaded from the unity website, meaning we were able to utilize a wider range of trees in our scene. I remember playing a PC game called 'Age of Mythology.' there would be a sandbox mode, where the player was actually able to play with the game engine, creating levels and objectives. When using the terrain tool, I was reminded of the ability to terraform and paint texture on to the land within the game. This was always my favourite aspect of designing levels, trying to create realistic mountain ranges with grass and dirt and the base, rock higher moving higher up and then finally, a touch of show and rock at the peak.

The first terrain test level.

Terrain tool used on my second shipyard.
Trees placed using the brush tool.
We also created our own seamless textures. We downloaded a texture from the web, and then used the offset filter. Using the clone tool, we merged the corners of the image together, making the texture repeatable. Here is my cracked dirt texture:

The most recent concept we studied, was efficient UV mapping. With our previous animation module, polygons were not an issue. We could use as many as we wished, the only possible issue being render time. Because a game is essentially rendering in realtime, there is a constant compromise between quality and frame rate. This means that as a game level designer, it is important to be as efficient as possible with the use of polygons. We only really need to create four different sides for our crate, and by using planar mapping, we were able to repeat the 4 sides of the UV map onto the six sides of the crate. By projecting the UV map onto the correct axis depending on the side of the crate, and then adjusting the size of the projection so that only one size is in frame, we were able to efficiently map our crate. We then imported the object as an FBX, keeping the attached media, we were able to apply our crate on our level in unity:

Crate UV map.

The crate in my Unity level.
I believe that the prospect of understanding how to use software that allows game level design is exciting. Although at points I found it hard to keep up with the tutorials, and there was a lot of information to take in, I aim to practice with the software like I had to with Maya. My first impressions of Unity, are that the interface isn't too complicated, and in fact it seems less confusing and daunting than Maya. Though, Unity isn't designed for 3D modelling, and maya will still be essential for achieving more complex shapes. At the stage, I need to try and catch up with certain tools such as the web converter and the more advanced texture mapping. Hopefully, these are features that will appear again over the tutorial processes, if not I will seek help from the module tutor.
No comments:
Post a Comment